Monday, May 30, 2011

Another Scarf

I bought some gorgeous wool at the Warehouse on the weekend, intending to use them to make some really really warm socks.  But when I crocheted a swatch to check the gauge, I found it was way out.  This made me sad, so I looked online at the Sean Sheep website that has patterns that are made specifically for their wool.  No luck - they didn't have my wool listed.  I did a google search for it too, and it didn't come up.  So now I'm making another scarf (see this post) and breaking my word to myself that I'd not start yet another project before any of the others are finished.  My excuse is that it looks like this:

And that's after an evening of crocheting (and a morning of undoing to get back to the tiny mistake that meant that it wouldn't sit straight.  I am using the scallop lace pattern from The Art of Crochet magazine that Mum bought me the first two issues of to get me started.  It's amazing how different it looks just because this wool is so much thicker and the hook I'm using is a 6mm instead of a 4mm.  I don't think it will take long to make a nice long scarf that I can actually wear!  Count me as a crochet fan now, move over knitting.

Friday, May 27, 2011

Links of the Week II

This week I found six links, but two are almost on the same topic, so it's not really cheating...  Really.

I had never thought of trilobites as a subject for needlepoint before seeing reference to this post on geekcrafts, but they are going on my list of things to do (after the embroidery, longstitch, another three canvases, knitting, crocheting...  I really have to finish something soon, or I'm going to go crazy!).

Well, even with all of the confusion of the exact time the world was going to end on Saturday, by now I think it's safe to say it didn't.  But that crackpot guy who made the prediction shouldn't feel too bad, he's not the only one who got it hilariously wrong.

The Nebula awards have been announced and it's time for every science fiction fan to add to their 'must read' list.

There are so many addictive little games on the internet.  This is one of them!  I just refound the game, and can't remember where I got up to...  I'm going to have fun figuring that out.

Archaeology:  Robots and NASA help us find out more about Ancient Egypt!
A robot with a 'micro snake' camera has been sent up one of the shafts inside the Great Pyramid to look past the door that stopped the last robot in 1993 (I remember how excited I was then!), and have found hieroglyphics that might help us figure out why the odd shafts were built.  And, with one mystery possibly solved, another (up to) 17 pyramids and even more tombs and other buildings have been rediscovered by a NASA satellite.  I hope they keep them buried, at least until we learn to bloody look after stuff!  BTW, Zahi Hawass is awesome!

Wednesday, May 25, 2011

Cornish Pasties or Samosas?

Last night we made a cross between a Cornish pasty and a samosa - potato and spice filling, short pastry casing.


Edmond's Cook Book Short Pastry
225g flour
¼t salt
125g butter/lard/margarine
1t baking powder
cold water to mix

Sift flour and salt, rub in butter, add baking powder.  Add a T of water at a time until the dough only JUST holds apart.  The crumblier the more tender the pastry will be when its cooked; if you add too much water, the pastry will be tough.   Pop into the fridge while you cook the filling.

Filling
4 medium potatoes
1 large carrot
1 large onion

1t turmeric
1t minced ginger
1t minced garlic
1t minced coriander
½t garam masala
1t curry powder of your choice
1t mustard seeds/full grain mustard
1t cumin seeds
1t cardamom
salt and pepper to taste


Parboil potatoes, then fry onions and carrots, add spices and stir while the spices cook a little and become fragrant.  Then add the potatoes, stir, and remove from the heat.  Let the mixture cool a little while you roll out the pastry, and cut into rounds using a small plate as a guide.  You should get about 5 (and a midget from the left overs).  Place 1-2T of filling into the middle of each round, wet the edges so the pastry sticks together, and then pinch two sides together to make a crescent.

Bake at 200° for about 15 minutes then check to ensure they're not going too brown.  If they are, turn the oven down to 190° for the rest of 30 mins.

They were so yummy.  We had savoy cabbage and broccoli with them.  And lashings of tomato sauce of course!

PS:  Savoy cabbage is so pretty, I had to take a picture of it!

Sweet and Sour Chicken - What To Do With Leftovers


I love dinners made from leftovers that totally change the original meal into something new.  Mum bought a cooked chicken on the weekend (on a related note, that will be the last time!) and we had it with veges and gravy.  But on Monday night we felt like something different, so we made the sweet and sour sauce from the Edmond's Cook Book, added a little ginger and chilli, stir fried some beans, capsicum, carrots, and the leftover chicken.  Lastly, some nice fat noodles went in.  Really simple, really delicious, and really good as leftovers for lunch the next day!

Edmond's Sweet and Sour Sauce

4T brown sugar
2T cornflour
4T white vinegar
1T soy sauce
1c water or liquid vegetables are cooked in

Combine all ingredients in a small saucepan and heat to boiling.  Reduce heat and an simmer until sauce is thick (2-3 mins).  Be careful as the sugar can make the sauce stick to the bottom of the pot.

Believe me, it looks so simple, but it's SO good.  I added a t of minced ginger, and a little minced chilli to warm it up a little.

Tuesday, May 24, 2011

Auckland can be Beautiful

On Sunday I met with a friend I haven't seen in a long time (she pointed out it had been a year and a half, but it never feels like it!), which meant a trip to the city.  I hate going to the city, but once I'm there I always enjoy myself.  The city is dirty and sometimes smells, but there are a lot of pretty places that make me smile and the whole place reminds me of the years and years at Auckland University (including the daily walk to and from).

Before I left Auckland for my two years in Australia, I took a photo of my favourite building, but I have no idea where that photo is, so on a whim I took another.  The problem is, the sun was in my eyes and so neither of the two I took are centred very well (one's all sky, the other all road) - it's these moments I wish I had a good camera with a viewfinder and crosshairs!

But I did get this once I crossed the road:


This is the building on the corner of Waterloo Quadrant and Princes Street that is covered in green all winter because of the ivy (or other plant...) covering it.  If you know Auckland University, you most probably know this building.  In the reflection in the window, you can see what a beautiful day it was!


Monday, May 23, 2011

Links of the Week

I go to so many brilliant websites in the course of my internet ambling, so, in order to educate you all on the brilliantness out there, I am going to sum up my week with five great links (this is for last week because I only decided to do this yesterday)!

I've been wanting to try this for ages, and finally did this week.  We omitted a few things (namely cream and slivered almonds) but found it a lovely mild but flavourful curry that I think I could eat at least once a week.  We are huge fans of sultanas in savory food, so this really hit the spot!

This is so pretty, I think someone's going to get these for Christmas...  Just don't know who yet!

Competition:  Not Martha
Not Martha is celebrating her blog's birthday month with a new prize every weekday!  Go win you some swag!

Monsters Inc is my favourite animated movie, hands down.  I went through a phase of watching it at least once a week for a few months.  I like Nemo, I like Toy Story, but Monsters Inc is my absolute favourite.  I am nervous for the sequel because sequels are usually not at good as the original, but I'm willing to give it a chance!

Geek (craft):  Trilobite Friday Roundup
Who knew how many gorgeous things you could make with trilobites as your inspiration?  I'm currently downloading the free patterns from the first one!

Tuesday, May 17, 2011

Mum's Birthday - Part Three: The Present

This is (finally) the last installment of the Mum's Birthday series (lol).  My mum loves butterflies, so much so that her bedroom is becoming festooned with butterfly pretties.  I thought I would add to that, but didn't know how to make something very special.  I had been collecting butterfly pictures from the Graphics Fairy, and finally settled on this one:


Pretty right?  But not exactly colourful.  So not something to simply print out and frame.  In a flash of inspiration I can only credit to the muses smiling on me (I haven't ever seen anyone do this before), I decided to buy a small painter's canvas, paint it, stencil the image onto it, then embroider it.  I didn't even know if it was possible to embroider painter's canvas when I bought it, but I never let silly things like impossibility stop me when I think I have a great idea for a surprise.  So, while the ladies fingers baked, I printed the image, used a lead pencil to colour in the back of the image then trace it onto the canvas (a technique for transferring images for embroidering that I learned here but altered to use a lead pencil), then painted the background:

I left the butterflies unpainted because I planned to applique some pretty fabric scraps, and didn't want the paint showing through them.  Next time I will paint further over the boarders of elements that will be appliqued, so that placing the fabric cut-outs need not be so exact.  I found I couldn't see the pencil marks well enough, and so traced it on again (using two reference points and pins to get it in the same place), as you can see in the picture.

Next I embroidered the thistles.  Because they were already painted, I needed only back stitch as if around a patch of satin stitch - the outline, thorns, thistle flowers.  I added a few French knots to be emerging thistle flowers.


The most difficult part of this process was putting my signature on the bottom.  I forgot about the wooden frame and signed in pencil just a little too low and had to pass the needle through at a terrible angle to avoid blunting it on the wood.  The picture may not show the detail very well, but you get the idea of how the embroidery creates a three dimensional effect.

Lastly, I tackled the butterflies.  First, I tried to simply pin the fabric onto the canvas, but it moved too much.  In the end I tacked the wings and body pieces onto the canvas with dressmaker's thread.


That's a piece of fake leather (the surface splits like anything!) and some shiny fabric left over from an old ball dress.  The white butterfly's wings are scraps from a project Mum did years ago.  After sewing the body with dark brown thread, I sewed around the edge of the wings with satin thread, added French knot eyes, and feelers.  I then made a design for the wings and used the same technique as above to transfer them onto the fabric.


This is (a terrible photo of) the finished product.  Although the photo is a bit blurry, I think you can see what I mean about the three dimensionality the embroidery thread created on top of the painting, and how it is emphasised by the material placed on top.  Anyone with keen eyes may notice that it turned out a little different to the original, with the most obvious example being the designs on the wings.  But I altered it to suit the medium and the colours (too much of that pretty salmony colour would have been ugly), and because I think my wing designs are prettier!

What do you think of it?  I haven't seen anyone else do exactly this before, though it is a fabulous way of creating a beautiful (if I do say so myself!) and very colourful image that is inexpensive (the canvas was from a $3 shop, the fabric was scraps, and most of the embroidery thread was from Mum's collection), and doesn't need framing.  Time will tell how dusty/faded it will get.  Mum loved it and is now inspired to do her own (which, with her permission, I will post on here once it's done).  I'm so happy with how it turned out that I am making one for myself too, and I think I have figured out what mine will be, but will wait until it's finished to announce it!

Monday, May 16, 2011

Mum's Birthday - Part Two: Croissants

I had always thought that croissants would be extremely difficult to make without years of practice.  But they weren't, and I'm very pleased about it, because they ended up extremely delicious!  The ones from the supermarket are always flat, soggy, and greasy, and they're also about $1 each.  Not worth it at all when you consider how many can be made with this recipe from The Holst's Bread Book.


The most difficult part of the whole process was cutting the triangles of rolled out dough before rolling them up into the little crab claw shapes.  I have made these once again since Mum's birthday, and found it just as difficult this time too.  I have decided that I will draw up a rectangle of greaseproof paper the size that the rolled out dough needs to be, and draw the triangles on it.  That way I can simply lay on top of the dough, and make marks on the dough through the paper with a blunt knife before cutting the dough with a sharp knife.  Believe me, with how dumb I seem to be in this department, it's worth the time.  I had to roll the dough out three times on the weekend, just great when you're keeping guests waiting by the time they're ready for the oven.

This is how they turned out without the egg glaze (from Mum's birthday):


And with the egg glaze (from this weekend, credit to Rachel for the photo!):


The egg glaze is really patchy because Mum threw the pastry brush away (she says I did it, but I know I didn't).  It was one of those ones that leaves bristles everywhere anyway, so I'm glad to see it go.  Just need to get a new one - silicone ftw!

In summary, do try this recipe, it's fabulous, and although it does have a lot of butter in it, they're not greasy pastry like the bought ones.

Thursday, May 5, 2011

Experimenting with Prettiness

If you're reading my blog today, you might notice its changing colours and backgrounds and pictures.  Do not be alarmed, I'm just playing about with the templates and trying to figure out exactly which is my favourite and suits me and the blog.  Call it experimenting with prettiness, or Autumnal redecorating.  Hopefully I'll have settled on something by the end of the day, but I'm not guaranteeing anything...

Wednesday, May 4, 2011

Margaret Fulton's 9" Sponge Sandwich

5 eggs
1¼c caster sugar
1¾c self-raising flour (or 1 ¾c regular flour and 1½t baking powder)
Good pinch of salt
1½t butter or margarine
5T hot water

Grease two 9" sandwich tins or a  9" cake tin and dredge with flour, or line with baking paper.  Separate eggs.  Beat egg whites stiffly, add sugar gradually beating until thick.  Add yolks.  Sift flour and salt together and fold into egg mixture lightly and evenly.  Fold in melted butter and hot water quickly and lightly.  Pour into tins and bake at 180° for 30 minutes or until cake springs back when lightly touched.

Mum's Birthday - Part One: The Cake

After two posts in a row without anything to do with cooking or crafts, I'm glad to finally talk about the projects I did for Mum's birthday.  My Mum's birthday is the 17th of April, so this post is very delayed because I have not felt like posting the horrible photos that I manage to take using my phone's camera.  I know, I need a real camera, but if I could afford it, I'd have bought one ages ago.  So I'm getting over it.

Firstly, the cake.  I had thought about what I should make for Mum's birthday cake for a week or so before the day, and had happened to see a picture of an awesome cake in:


It looked much like the cake in the lower right hand corner of the cover - what looked like ladies' fingers around the outside of the cake and chocolates on top, with a pretty little ribbon.  Suddenly, I knew what I would make:  Tiramisu Cake.


I used the 9" sponge sandwich recipe from The Margaret Fulton Cookbook (1976 reprint of the 1968 book), a book that Mum has always had but never really used.  While perusing the pages, I found another yummy recipe, this one for Spanish fish, that I will share in another post.  The sponge was a huge success on its own, but did it ever take a lot of effort to fold the dry ingredients into the egg whites!  I even had to let Mum take over for a while.  I think I need a bigger plastic or glass bowl for making bread and sponges, because the biggest bowl we have is one of my stainless steel ones, and neither yeast nor egg whites like metal.  Eventually the sponge looked like this:


Next, Mum cut the cake because I was totally not game to, and was then chased from the kitchen.  I then filled the sponge with a mixture of 1c of cream, a pouch of mascarpone cheese, 2T icing sugar, and 4T of Kahlua (coffee liquor).  This wasn't from a recipe, as such, I kind of made it up using a recipe for tiramisu, so I tasted it before using it, to make sure that the Kahlua was strong enough and the mixture was sweet enough.  After tasting it, I made sure I left some in the bowl at the end to eat, it was SO good.

Then I covered the top with dark chocolate ganache and added oreo truffles that I made the night before.  Lastly, I took the ladies' fingers I made three days previously and put in the freezer (apparently they go stale really fast), and defrosted them and crisped them up in the oven, then drizzled white chocolate all over them.  When they were set, I cemented them onto the outside using more dark chocolate ganache.  Then I tied the ribbon around.  End result:


I think it turned out really really well, I'm incredibly proud of it.  I only wish that I had put baking paper under it when I decorated it in order to keep the plate clean, but you live and learn.

I made the ladies' fingers from scratch using a recipe from here.  It may look tricky, but it was surprisingly easy.  I will make them again, because they are light and crispy and I can imagine they'd be great dipped in stuff - hot chocolate, chocolate sauce, chocolate fondue....  You get the picture.  The piping was the only tricky part, and in the recipe they suggest leaving a large amount of room between the fingers when you pipe them so that they can expand in the oven.  They don't.  Well, they didn't for me anyway, no more than any other biscuits.  I found the suggested length of 7.5cm was just enough to reach the top of the cake, but if you wanted to make that basket effect the cake on the cover of the book has, where the ladies' fingers would keep fruit or chocolate from falling off the cake, make them a little longer.

This is them after I drizzled white chocolate over them.  I had too much mixture (or too much empty space on my baking sheets) to fit onto two large baking sheets, so I cooked those and then piped a heart shape (to save for Mother's Day in the freezer) and a large biscuit so I could try one.  I had about four biscuits left over after decorating the cake.

In the next post about Mum's birthday, I'll talk about the croissants I made for breakfast-that-turned-into-brunch-that-became-lunch!

Tuesday, May 3, 2011

Remember those cute and silly quizzes we all used to take online back in highschool? Or the ones from magazines we still sometimes do? Well, I stumbled across one for determining which Star Trek character you are, and I'm happy with the result so I'm posting it. Just because I can, so there.
You are Beverly Crusher
Beverly Crusher
85%
Deanna Troi
70%
Chekov
65%
Uhura
65%
Jean-Luc Picard
65%
An Expendable Character (Redshirt)
60%
Will Riker
55%
Leonard McCoy (Bones)
50%
James T. Kirk (Captain)
45%
Mr. Scott
40%
Spock
39%
Data
29%
Mr. Sulu
25%
Geordi LaForge
25%
Worf
25%
A good physician and a caring parent.
You are devoted to your children
and to your occupation.
Click here to take the "Which Star Trek character are you?" quiz...

Monday, May 2, 2011

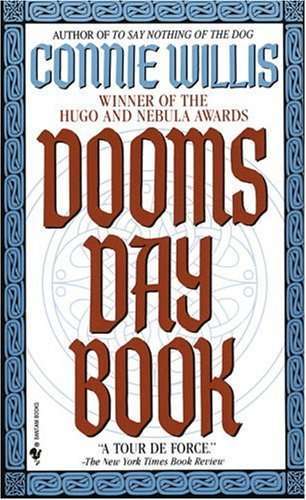
Book Review - Connie Willis' Doomsday Book

I know I don't usually post this kind of thing, but I found I had a lot to say about this month’s Women in Science Fiction Book Club book – Connie Willis’ Doomsday Book - so I thought I would make a blog post about it where I can prattle on as I like without filling up the forum.  PLEASE NOTE I have put a lot of spoilers in this (and a lot of words), so if you haven’t read the book and would like to, and you like surprises when you read, then stop reading now until you’ve read the book.  I mean it, go read the book.  Read it?  Good, now let’s begin (Click on the image to show my review).


Spoiler-free again now.  To sum up, I strongly suggest reading this book if you like time travel, anthropology and archaeology, science fiction and health, or just a good adventure story about people struggling against forces outside of their control that does not have a necessarily 'happy ever after' ending (that is not a spoiler as there are so many possible endings that fit that criteria).

LinkWithin

Related Posts Plugin for WordPress, Blogger...